Selling your products using Search Network campaigns
If you’re not familiar with Search Network campaigns, please have a look at our previous article on “how to use Google AdWords for my website”. We show you the very basics of the Search Network, and how to set up your first AdWords campaign.
Now, let’s dive more into how you can use Google AdWords for your Shopify store.
Essentially, what you want to do is to sell more products. And just displaying some ads about your products to potential customers won’t cut it. If it was sufficient, everyone would be rich nowadays.
In other words, there has to be a match between what you’re trying to sell, and what they’re looking for. And the best way to do that is to be in good terms with Google’s “quality score”. It’s a metrics that Google uses to determine whether or not your ads should be served to people, and how much it’s going to cost you.
This indicator makes it easier for you to sell more products by following these three principles:
- Ad Relevancy: Your ads have to be highly relevant to what you’re trying to sell. So, for example, if you’re promoting the benefits of your new broom, people shouldn’t land on a dog food page.
- Keywords Relevancy: The keywords you use to trigger your ads should match with the content of your ads. So, if someone types “US vacations”, when don’t want to see car ads.
- Landing Page Relevancy: The landing pages you drive people to by clicking your ads should match tightly with your ads’ content and the keywords you’re using.
You have to stay consistent during the whole advertising cycle, from the keywords that trigger your ads, to your ads’ content, to the end product. But the great thing is that if you follow these principles tightly, you’ll end up with qualified traffic, and increase your sales in return.
Let’s take a completely random example. Imagine that you’re trying to sell pet products, e.g. “petsmart”.

How would you proceed to promote your products?
You would start by creating a campaign that promotes pet products to people that type “pet products” on Google, right?
WRONG. That’s not how you should do it.
First, you would have to take a close look at your site’s categories structure. And it’s generally easier to look directly at your menu bar, because you’ve already done this preliminary work:

So, we see some interesting things here:
- Shop by brand: you could create a campaign for people looking for pet products of a specific brand.
- Shop by pet: you could create a campaign for people looking for pet products such as dogs, cats, fishes, etc.
- Pet services: you could create a campaign for people looking for pet services such as grooming, training, hotel, etc.
- Sale: you could create a campaign for people looking for pet products and sales discounts.
To do just that, first go to “All Campaigns”, then click on “Campaigns” and “New Campaign”.
You would then have to choose your goal, which is obviously “sales” here:
And then, you’ll see all the various kind of campaigns we’ve mentioned above. You should choose “Search”, here:
You should then tick either just “website visits”, or both “website visits” and “store visits” if you have both. It will essentially let Google track people who either visit your store’s website, or your actual physical store location by tracking their GPS data:
You’ll then be asked to fill your campaign’s name, and the networks you want your campaign to run on. Make sure to untick “Google search partners” and “Google Display Network”, mostly because you would otherwise have text ads running in competition with images. And that wouldn’t convert very well:
Then, select the location and the language of the people you want to target:
You’ll then be prompted to select the “audience” you want your ads to target. Since you’re only beginning with Google AdWords, it wouldn’t be wise to select “targeting” because there would be a risk to miss a lot of potential sales and clicks. So, for now, you should run in on “observation”, so that you can actually observe the audiences that are the most likely interested in your products, and decide later on to actually target them:

After that step, you’ll have to set up properly the budget you want to spend on a daily basis, the delivery and the way you want to evaluate the success of your campaigns. You don’t have to start with a huge budget but starting with $30-50 per day is a good idea.
Select the “standard” delivery method to make sure your ad is displayed evenly through the day, and not very quickly because there’s a risk to blow your budget early on.
At first, you shouldn’t pick the “conversions” or “conversion value” objectives because there simply won’t be enough historical data available for Google to help you with that. So, you’ll have to either select “clicks” or “impression share”. We do recommend “clicks” as you want to be in control of how much you paid for how much traffic:
Once that’s done, you will be prompted to set up your ad extensions. Those are snippets that are displayed along your ads such as your store’s location, phone number, special offers, etc.
Use those extensions extensively because they’re extremely helpful to provide more information, and they also help you take more real estate space on Google.com’s ad section.

Once that’s done, you’ll be prompted to create your first ad group. Essentially, ad groups are a way to divide your campaigns into sub-groups in a more meaningful way. To take the example of the “shop by pet” section of Petsmart, the campaign could be structured in such a way:

If you take a look at Petsmart’s dog category, you’ll see that there are a lot of sub-categories as well:

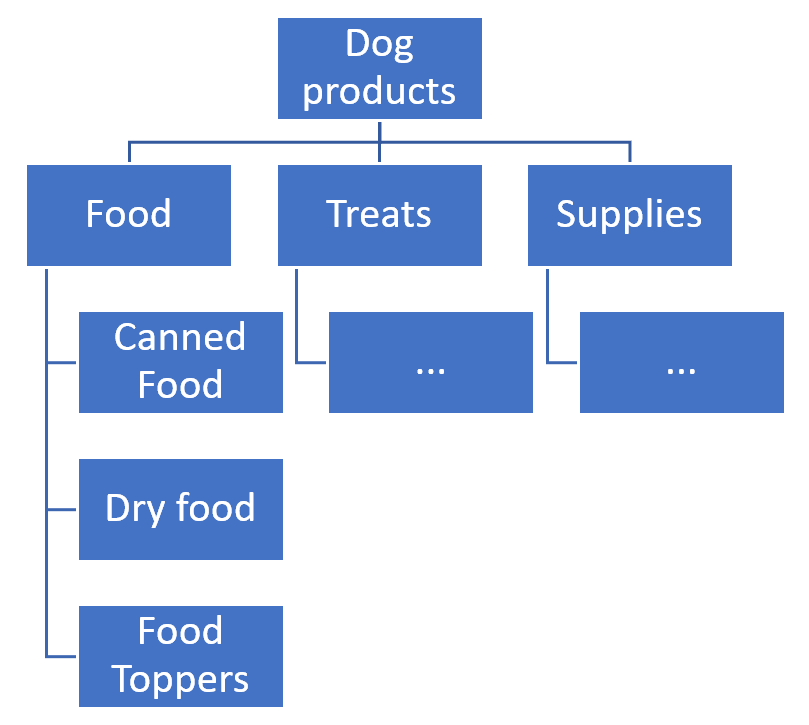
In this kind of situation, you should therefore create a dedicated campaign. Here, that would be the “dog” campaign, and the sub-groups could be either each individual item, or the “food”, “treats” and “supplies” categories.
It would look like this:

Each of these categories would be an “ad group” on its own. And to come back to our campaign creation process, you would have to add appropriate matching keywords. For example, if you were creating the “biscuits & bakery” ad group in the “dog campaign”, you would have to add the appropriate keywords such as this:

You’ll then have to fill in your ad copy such as the final URL where people who click will land, what they see in the headlines, the descriptions, etc.

Your ad will then look something like this:


Your “Dogs” campaign would soon start to look like this:

Once all of your Dog campaign’s ad groups are created, and that all the individual keywords have been set up for each ad group, make sure that your campaign’s settings are correctly set. That includes parameters such as the location, the schedule, the devices used, the budget, etc.:

And now, you’re done. Tada, you’ve created your very first Google AdWords campaign based on a meaningful structure. Each ad group has its own theme, its own keywords and its own ads. You’re ready to start shooting the ads!


